
Many of you probably have already heard about the Infrastructure as Code (IaC) process that employs a declarative approach to manage and provision system infrastructure via machine-readable definition files. There are a lot of tools/frameworks/Cloud services nowadays (Terraform by HashiCorp, AWS CDK, AWS Serverless Application Model (SAM), AWS CloudFormation, Google Deployment Manager) that offer this out of the box. But what if I tell you that you can achieve this by simply dragging and dropping blocks on a diagram without writing a line of configuration and/or code (or can we call it Infrastructure as Diagram approach)?
At re:Invent 2022, AWS announced the Application Composer service (currently in preview) that helps to streamline and accelerate the architecture, configuration, and build of serverless applications.
This hands-on tutorial will include the following topics:
- how to create infrastructure via AWS Application Composer Console
- how to test generated infrastructure template locally using SAM and DynamoDB Local image
- creating simple Node.js applications to read/persist data to DynamoDB
- deploying infrastructure and code into your AWS account using SAM
Development Environment prerequisites
Things you need to do before starting:
- Create your AWS account to access AWS Console
- Install AWS SAM: https://docs.aws.amazon.com/serverless-application-model/latest/developerguide/install-sam-cli.html#install-sam-cli-instructions
- Install AWS CLI: https://docs.aws.amazon.com/cli/latest/userguide/getting-started-install.html
- Install Docker: https://docs.docker.com/get-docker/
Drawing infrastructure diagram
Let’s imagine we need to build an infrastructure for a simple TODO application where user can:
- read all todo items
- create new todo
- update todo by either changing its title or completing it
Go to Application Composer Console and click the “Create project” button. Ensure you are creating a project in Connected mode – this way Application Composer will automatically sync changes between the browser and your local filesystem. This cool functionality is available thanks to browser-native File System Access API. Note, that if you are using Chrome/Edge/Opera, the browser will request special permission to grant read-write access to the folder you specified.

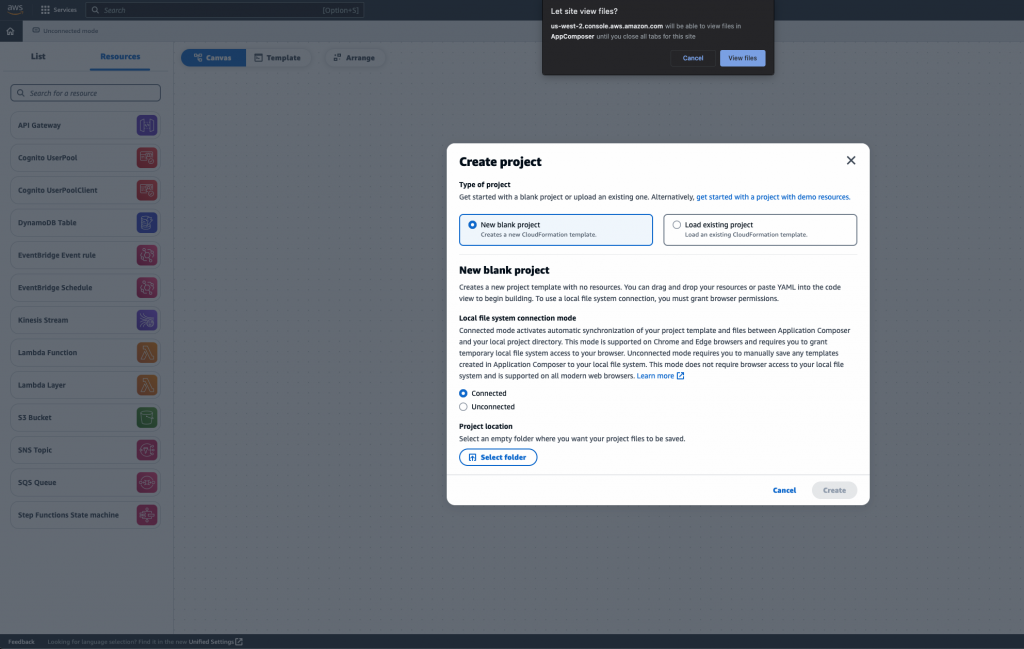
If you are using Firefox or Safari, this mode will not available – this is because FileSystemHandle.requestPermission and FileSystemHandle.queryPermission APIs are still experimental. However, it does only mean that you won’t be able to enjoy the automatic sync of the infrastructure template changes and have to manually download it every time you apply changes to your diagram.
Now let’s go to the most interesting part – dragging and dropping 🙂 I draw the following diagram in my project:

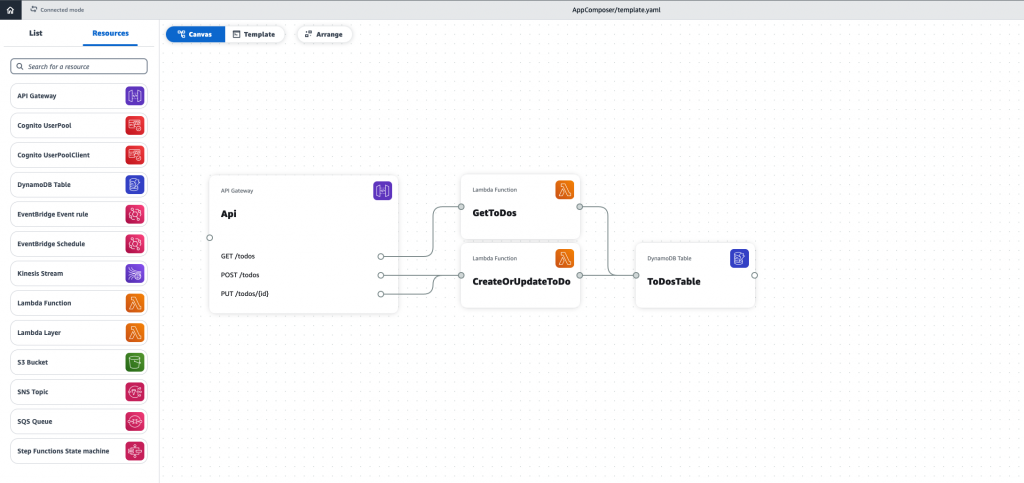
When designing my infrastructure, I decided to predict a read-write pattern for my app and assumed that it will be more read-heavy – hence, may require different scaling approaches for read and write operations. So I created two Lambda functions that use API Gateway as an event source. That’s basically it!
Now you can go to your project folder and find generated SAM template. Application Composer even defined DynamoDBCrudPolicy execution policy for my Lambda functions (narrowed down to ToDosTable resource – least privilege principle, how cool is that?). However, I still recommend manually changing it to DynamoDBReadPolicy for our GetToDos function.
Implementation
Now let’s add some code before debugging our application locally.
Let’s define our DynamoDB mapper first (I used @aws/dynamodb-data-mapper library for this):
const {
  DynamoDbSchema,
  DynamoDbTable,
  DataMapper,
} = require("@aws/dynamodb-data-mapper");

class ToDoItem {
  get [DynamoDbTable]() {
    return process.env.TABLE_NAME; // Table name will be passed via environment variables
  }
  get [DynamoDbSchema]() {
    return {
      Id: {
        type: "String",
        keyType: "HASH",
      },
      Title: { type: "String" },
      CreatedAt: {
        type: "Number",
      },
      ModifiedAt: {
        type: "Number",
      },
      CompletedAt: {
        type: "Number",
      },
    };
  }
}

class ToDoItemMapper {
  constructor(client) {
    this.mapper = new DataMapper({
      client, // the SDK client used to execute operations
    });
  }
  scan() {
    return this.mapper.scan(ToDoItem);
  }
  getById(id) {
    const item = new ToDoItem();
    item.Id = id;
    return this.mapper.get(item);
  }
  put(item) {
    return this.mapper.put(item);
  }
  update(item) {
    return this.mapper.update(item);
  }
}
Our list handler will look as simple as this:
const mapper = new ToDoItemMapper(ddbClient);

exports.handler = async () => {
  const iterator = mapper.scan();
  const todoItems = [];
  for await (const record of iterator) {
    todoItems.push(transform(record));
  }
  return {
    statusCode: 200,
    body: JSON.stringify(todoItems),
  };
};
CreateOrUpdate handler:
const mapper = new ToDoItemMapper(ddbClient);

const createToDo = async ({ title }) => {
  if (!title) {
    throw new Error(
      "InvalidParameterException: title attribute is required"
    );
  }
  const item = new ToDoItem();
  const now = Date.now();
  item.Id = uuid.v4();
  item.Title = title;
  item.CreatedAt = now;
  item.ModifiedAt = now;

  const persisted = await mapper.put(item);
  return transformToModel(persisted);
};

const updateToDo = async (item) => {
  if (!item.id) {
    throw new Error("InvalidParameterException: id attribute is required");
  }
  const itemToUpdate = await mapper.getById(item.id);
  itemToUpdate.ModifiedAt = Date.now();
  itemToUpdate.Title = item.title;
  itemToUpdate.CompletedAt = item.isCompleted === true ? Date.now() : undefined;

  const persisted = await mapper.put(itemToUpdate);
  return transformToModel(itemToUpdate);
};

exports.handler = async (event) => {
  if (event.requestContext.httpMethod === "POST") {
    const newItem = await createToDoItem(JSON.parse(event.body));
    return {
      statusCode: 200,
      body: JSON.stringify(newItem),
    };
  }

  if (event.requestContext.httpMethod === "PUT") {
    const id = event.pathParameters.id;
    const requestPayload = JSON.parse(event.body);
    const updatedItem = await updateToDoItem({ ...requestPayload, id });
    return {
      statusCode: 200,
      body: JSON.stringify(updatedItem),
    };
  }
  return {
    statusCode: 405,
    body: "Method not supported",
  };
};
You can find a full example in my GitHub repo.
Running locally
Now let’s try to run our application locally before deploying it to production. SAM already comes with start-api command that will start local API Gateway instance routing requests to local Lambda runtimes. However, we need to persist our data somewhere. The simplest solution would be to connect our local Lambdas to DynamoDB running in the cloud (for instance, if you have some staging environment that replicates production). But for our example, let’s assume we don’t have any environment setup yet and try to run in-memory DynamoDB database locally:
docker run -p 8000:8000 amazon/dynamodb-localAnd here comes the first challenge: SAM also uses Docker to run local API Gateway and Lambda functions, and the docker container is NOT running the DynamoDB Local process INSIDE the container (localhost) – any request to http://localhost:8000 within Lambda function will fail.
The fix is simple – create a Docker network and explicitly specify it for both SAM and DynamoDB containers!
docker network create sam-demo-net
docker run -p 8000:8000 --network sam-demo-net --name ddblocal amazon/dynamodb-local
sam local start-api --env-vars json/env.json --docker-network sam-demo-net
Now we can use Docker’s service discovery feature and access DynamoDB local endpoint using the container name (ddblocal):
const ddbClient = new DynamoDb({
  ...(process.env.AWS_SAM_LOCAL === "true"
    ? { endpoint: "http://ddblocal:8000" }
    : {}),
});
See full launch instructions in the README file.
Now it’s time to test it!
Insert a todo item in the table by executing the following CURL command at the prompt:
curl -X POST -d '{"title":"test ToDo"}' http://127.0.0.1:3000/todos

{"id":"25962e09-7f16-4ab9-ac88-64f8c4a20710","title":"test ToDo","isCompleted":false}%
Let’s retrieve todo items from the local DynamoDB instance by executing the following CURL command at the prompt:
curl http://127.0.0.1:3000/todos

[{"id":"25962e09-7f16-4ab9-ac88-64f8c4a20710","title":"test ToDo","isCompleted":false}]%
And finally, let’s complete our todo item:
curl -X PUT -d '{"title":"test ToDo (completed)", "isCompleted": true}' http://127.0.0.1:3000/todos/25962e09-7f16-4ab9-ac88-64f8c4a20710

{"id":"25962e09-7f16-4ab9-ac88-64f8c4a20710","title":"test ToDo (completed)","isCompleted":true}%
All works – great! Let’s deploy!
Time to launch!
With AWS SAM, deployment is as simple as running one command:
sam deploy --guided--guided flag will launch a wizard that will help you to configure deployment options (AWS CloudFormation stack name, AWS regions, etc). Once you complete this wizard the very first time, you will be offered to save this deployment setup and re-use it in the upcoming deployments.
As a result of this operation, SAM will transform its template to a format compatible with CloudFormation, and create a stack based on it in the account you specified in your AWS SDK config.
Final thoughts
It would be exciting to see how this service will evolve in the future. Will it introduce a new approach that will extend Infrastructure as Code (IaC) – Infrastructure as Diagram (IaD)? At least, would be nice to see in-depth integration with SAM APIs (deploy, package, pipeline bootstrap) that will give users a “native” way to provision AWS infrastructure directly from AWS Application Composer Console.
Discover more from The Same Tech
Subscribe to get the latest posts sent to your email.
Love your words thankyou so much I agree
Thank you!