In one of my previous articles, I already talked about how sometimes we don’t even notice the algorithms around us. When using a tool or library, we consume it as a given without even understanding how it works behind the scenes. Today I am going to reverse-engineer the algorithm Jest uses to find related tests when we run jest --findRelatedTests.
What is Jest and how I can use it?
Jest is a popular JavaScript testing framework used in almost every project nowadays. You can start with it simply by creating any test file with test.js extension and run jest command in your terminal. Jest also provides extensive configuration options developers can use to define what tests to include/exclude, what coverage output to generate in which format, how to transpile source files etc. – you can find all of this in the official docs. The most exciting option is to run jest with --findRelatedTests and passing list of the files you want to test:
jest --findRelatedTests /path/to/file1, /path/to/file2This way Jest will run not only direct tests associated with these files but also the test for transitive dependencies. It becomes super handy when it comes to optimizing git pre-commit command execution. Instead of running an entire set of tests every time you are about to commit a new change, Jest will run only a set of tests that are actually impacted by corresponding change saving developers a great amount of time while being accurate with results.
Jest file system
Jest uses a custom haste module system for building metadata about the files and dependencies between them in an optimized way. This component definitely deserves its own “Under the hood” article. For now, let’s simplify that it provides API to get a collection of all files in the project and its dependencies in the following shape:
Array<{
    // absolute file path
   file: string;
   // list of depedencies (modules imported in current file)
   dependencies: Array<string>;
}>
Looking under the hood
What do we know:
- set of files that have been added/modified/deleted and staged in Git
- and entire file system metadata
Now we need to find an algorithm to detect and run only test files that have been impacted by this change.
And Jest provides resolveInverse API to solve this problem:
  resolveInverse(
    paths: Set<string>,
    filter: (file: string) => boolean,
    options?: ResolveModuleConfig,
  ): Array<string> {
    return this.resolveInverseModuleMap(paths, filter, options).map(
      module => module.file,
    );
  }
where:
pathsis a set of file paths that have changedfilteris a predicate function to detect whether the current file is a test fileoptionsobject (not relevant for the algorithm, ignore it for now)
resolveInverseModuleMap uses a very straightforward approach to solve this problem that is based on Breadth First Search (BFS). First of all, it initializes the following sets:
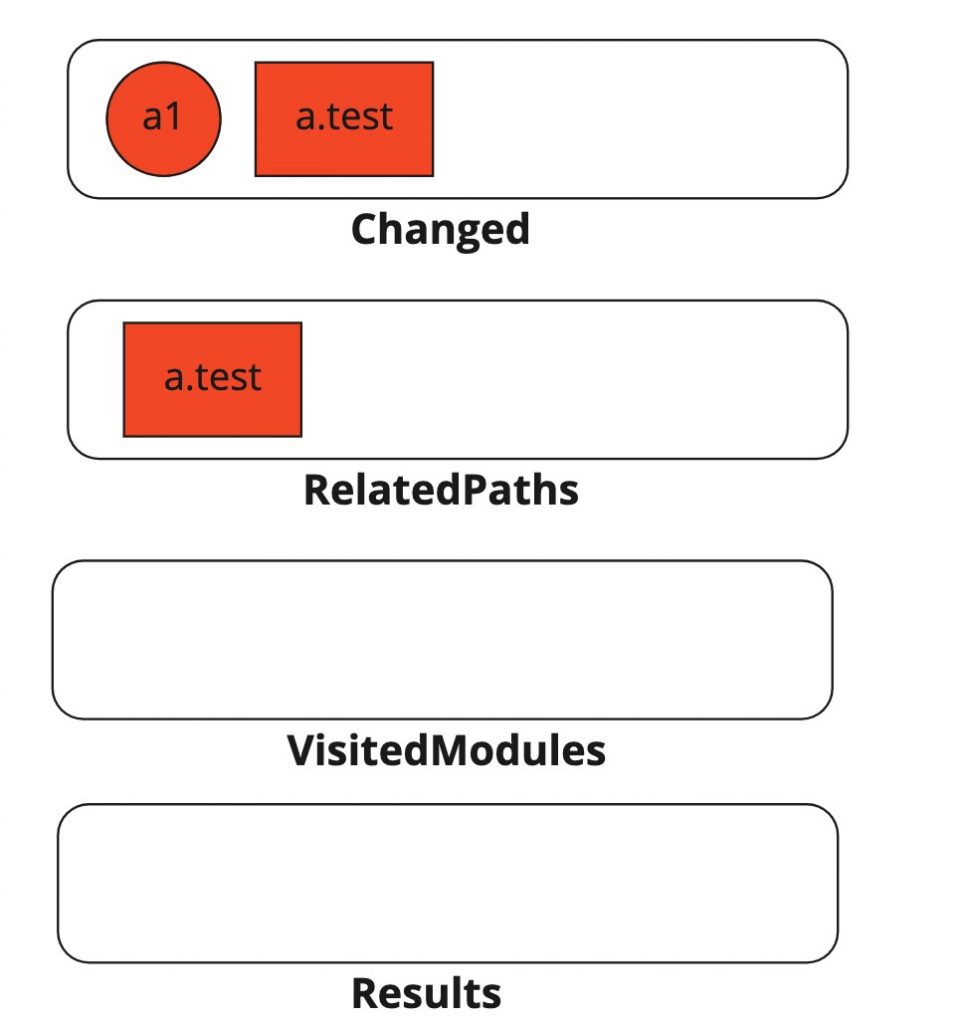
changed– set of files that have been affected. Basically, it is a temporary set that is mutated after every iteration of BFS, and serves as a termination indicator – the algorithm stops when it’s empty. On the first iteration, this set is populated frompathsprovided as input.relatedPaths– set of test files that have been affected. By default, this set is populated frompathsinput but with the condition that the file is actually a test file. On every iteration of BFS, every matched test file is removed from this file. At the end of the algorithm, the remaining file paths in this set are concatenated with the results of BFS execution. This is to handle a simple use case when the change was made in the test file and not in the source.visitedModules– files that have been already traversed and can be skipped from further processing.
So let’s visualize our algorithm. First of all, let’s define our example file system:

Blocks in red represent changed modules (rectangles are test files, and circles are source files). Arrows start from parent to child (meaning that a module is imported by a.test and a1). Initially, our data structures will look like this:

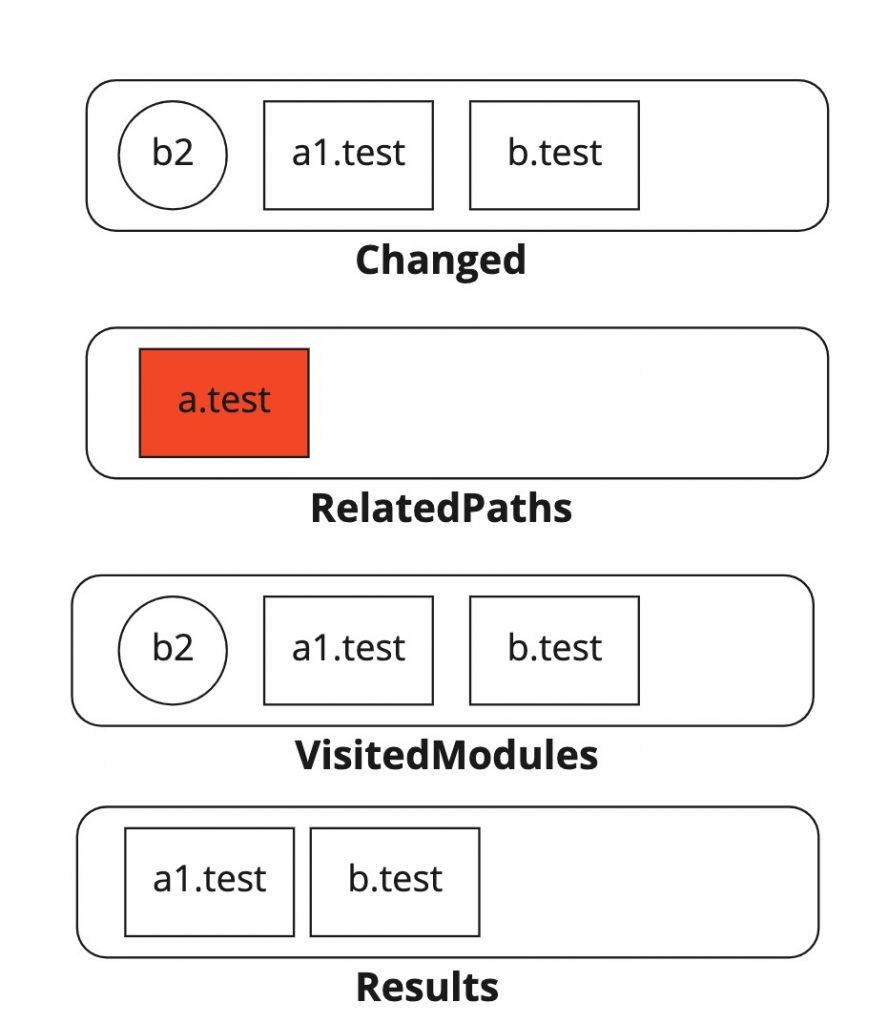
Our changed set is not empty. That means we need to traverse all files in our filesystem to get a list of dependencies for every module in changed set. After the first iteration, we already discovered that at least b.test and a1.test needs to be run as dependencies of a.test and a1 respectively:

Doing another traversal. Now we see that b2 is imported into both a.test and b2.test but we already have a.test in our originally changed files. In this case, we need to remove it from relatedPaths set and add it to the results. In case if a.test didn’t have any dependency, Jest would simply merge it into results when returning it to the upstream caller.

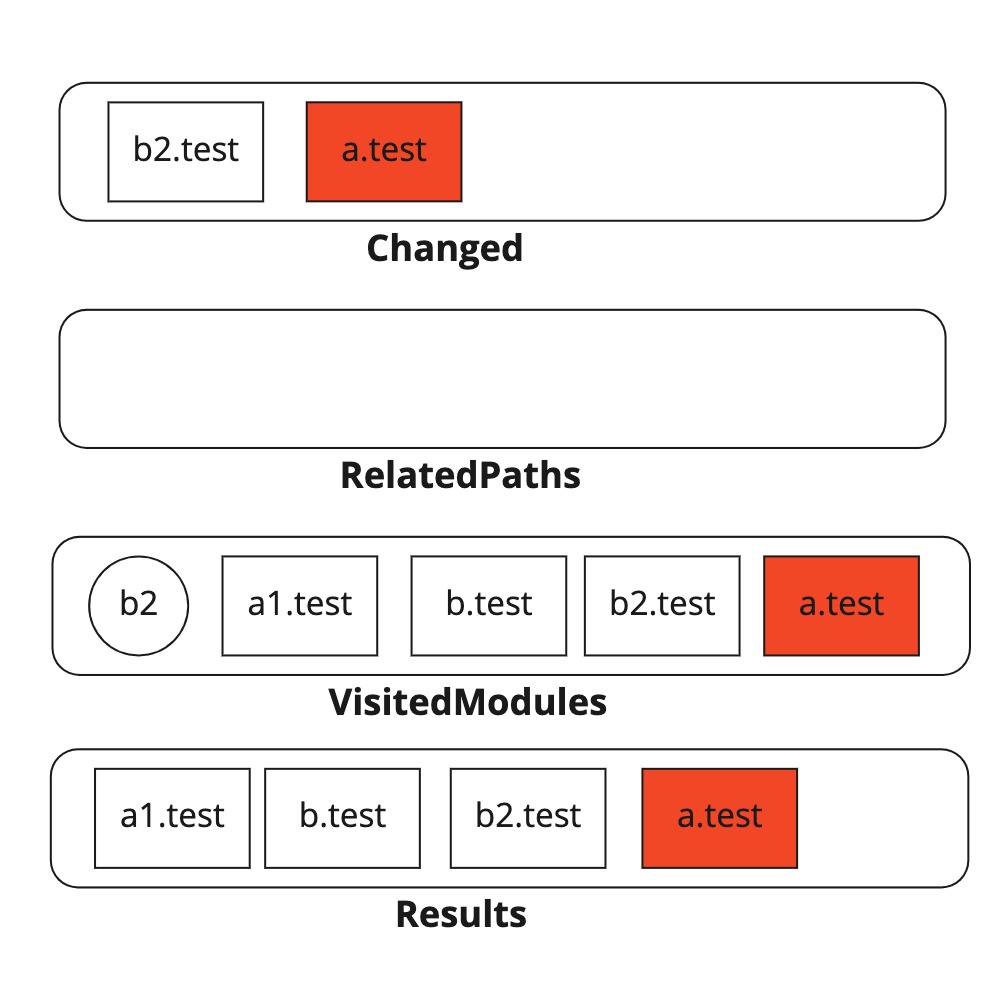
In the end, we have only 2 test modules in our changed set and we already see that a.test is in our visited set and b2.test does not have any dependents. Basically, no-op here – after this iteration changed set will become empty, and we will break out of our BFS loop.

As result, we could narrow down our test scope from 5 test files down to 4. It’s not so impressive but keep in mind that I have picked a very small dataset for this example for simplicity – in real-world projects, there would be thousands of files, and improvement can be really drastic.
You can find the original implementation here.
Final thoughts
Do you think this algorithm can be improved? What if we could have inverse links to the dependent modules as part of file metadata (similar to DOM elements that have reference to the parent)? In this case, we would not have to traverse the entire file system and focus only on a subset of it.
Discover more from The Same Tech
Subscribe to get the latest posts sent to your email.

Be First to Comment